本文主要介绍了 gRPC 压测工具 ghz ,包括 ghz 的安装、使用及压测计划制定等。
原文作者:意琦行
原文链接:gRPC(Go)教程(十)—gRPC压测工具ghz | 指月小筑|意琦行的个人博客
1. 安装
可以直接在Release页面下载二进制文件,也可以 clone 仓库手动编译。
下载解压后即可使用
 1
 2
 3
 4
 5
 6
 7
 8
 9
10
11
12
13
| # 下载
$ wget https://github.91chifun.workers.dev/https://github.com//bojand/ghz/releases/download/v0.94.0/ghz-linux-x86_64.tar.gz
ghz-linux-x86_64.ta 100%[===================>] 10.41M 1.84MB/s 用时 5.7s
# 解压
$ tar -zxvf ghz-linux-x86_64.tar.gz
ghz
ghz-web
LICENSE
$ ls
ghz ghz-linux-x86_64.tar.gz ghz-web LICENSE
# 添加到环境变量
$ sudo vim /etc/profile
$ source /etc/profile
|
具体语法
ghz-web是一个补充性服务器和一个用于存储、查看和比较ghz测试结果的 Web 应用程序。
基本的总体思路是ghz用于生成 JSON 报告,并使用curl或类似工具提取 JSON 报告以保存结果,以便随着时间的推移存储、查看、比较和跟踪它们。
2. 参数说明
只列出了常用参数,其他参数可以查看官方文档或者查阅帮助命令ghz -h
大致可以分为三类参数:
2.1 基本参数
--config:指定配置文件位置
--proto:指定 proto 文件位置
--call: 指定调用的方法
-c:并发请求数
-n:最大请求数,达到后则结束测试
-d: 请求参数
- JSON格式,如
-d '{"name": "Bob"}'
-D:以文件方式指定请求参数,JSON文件位置
-o:输出路径
-O/--format:输出格式,有多种格式可选
以上就是相关的基本参数,有了这些参数基本可以进行测试了。
2.2 负载参数
负载参数主要控制ghz每秒发起的请求数(RPS)。
-r/--rps: 指定RPS
--load-schedule: 负载调度算法,取值如下
const: 恒定RPS,也是默认调用算法
step: 步进增长RPS,需要配合load-start,load-step,load-end,load-step-duration,和load-max-duration等参数
line: 线性增长RPS,需要配合load-start,load-step,load-end,load-step-duration,和load-max-duration等参数,其实line就是step算法将load-step-duration时间固定为一秒了。
--load-start:step、line 的起始RPS
--load-step:step、line 的步进值或斜率值
--load-end:step、line 的负载结束值
--load-max-duration:最大持续时间,到达则结束
例如
1
| -n 10000 -c 10 --load-schedule=step --load-start=50 --load-step=10 --load-step-duration=5s
|
从50RPS开始,每5秒钟增加10RPS,一直到完成10000请求为止。
1
| -n 10000 -c 10 --load-schedule=step --load-start=50 --load-end=150 --load-step=10 --load-step-duration=5s
|
从50RPS开始,每5秒钟增加10RPS,最多增加到150RPS,一直到完成10000请求为止。
1
| -n 10000 -c 10 --load-schedule=line --load-start=200 --load-step=-2 --load-end=50
|
从200RPS开始,每1秒钟降低2RPS,一直降低到50RPS,一直到完成10000请求为止。
line 其实就是 step,只不过是把–load-step-duration固定为1秒了
2.3 并发参数
-c:并发woker数,
--concurrency-schedule:并发调度算法,和--load-schedule类似
- const:恒定并发数,默认值
- step:步进增加并发数
- line:线性增加并发数
--concurrency-start:起始并发数
--concurrency-end:结束并发数
--concurrency-step:并发数步进值
--concurrency-step-duration:在每个梯段需要持续的时间
--concurrency-max-duration:最大持续时间
例子:
1
| -n 100000 --rps 200 --concurrency-schedule=step --concurrency-start=5 --concurrency-step=5 --concurrency-end=50 --concurrency-step-duration=5s
|
固定RPS200,worker数从5开始,每5秒增加5,最大增加到50。
注意:5个worker时也要完成200RPS,即每个worker需要完成40RPS,到50个worker时只需要每个worker完成4RPS即可达到200RPS。
通过指定负载参数和并发参数可以更加专业的进行压测。
2.4 配置文件
所有参数都可以通过配置文件来指定,这也是比较推荐的用法。
比如这样:
 1
 2
 3
 4
 5
 6
 7
 8
 9
10
11
12
13
14
15
16
17
18
19
| {
"proto": "/path/to/greeter.proto",
"call": "helloworld.Greeter.SayHello",
"total": 2000,
"concurrency": 50,
"data": {
"name": "Joe"
},
"metadata": {
"foo": "bar",
"trace_id": "{{.RequestNumber}}",
"timestamp": "{{.TimestampUnix}}"
},
"import-paths": [
"/path/to/protos"
],
"max-duration": "10s",
"host": "0.0.0.0:50051"
}
|
3. 使用
该工具有两种使用方式。
ghz 二进制文件方式,通过命令行参数或者配置文件指定配置信息ghz/runner编程方式使用,通过代码指定配置信息
二者只是打开方式不同,具体原理是一样的。
首页启动服务端,这里就是要之前HelloWorld教程中的Greeter服务。
1
2
| golang_study/grpc_study/helloworld/server$ go run main.go
2022/04/22 15:56:17 Serving gRPC on 0.0.0.0:50051
|
3.1 命令行方式
1. 基本参数
首先使用基本参数进行测试
1
2
3
4
5
6
| ghz -c 10 -n 1000 \
--insecure \
--proto ./hello_world.proto \
--call helloworld.Greeter.SayHello \
-d '{"name":"Joe"}' \
0.0.0.0:50051
|
--call helloworld.Greeter.SayHello:说明,具体 proto 文件如下
1
2
3
4
5
| // 省略其他代码...
package helloworld;
service Greeter {
rpc SayHello (HelloRequest) returns (HelloReply) {}
}
|
可以看到,包名为helloworld、 service名为Greeter,方法名为 SayHello。
结果如下
 1
 2
 3
 4
 5
 6
 7
 8
 9
10
11
12
13
14
15
16
17
18
19
20
21
22
23
24
25
26
27
28
29
30
31
32
| Summary:
Count: 1000
Total: 50.26 ms
Slowest: 2.00 ms
Fastest: 0 ns
Average: 0.25 ms
Requests/sec: 19894.92
Response time histogram:
0.000 [508] |∎∎∎∎∎∎∎∎∎∎∎∎∎∎∎∎∎∎∎∎∎∎∎∎∎∎∎∎∎∎∎∎∎∎∎∎∎∎∎∎
0.200 [26] |∎∎
0.400 [52] |∎∎∎∎
0.600 [373] |∎∎∎∎∎∎∎∎∎∎∎∎∎∎∎∎∎∎∎∎∎∎∎∎∎∎∎∎∎
0.800 [28] |∎∎
1.000 [1] |
1.199 [3] |
1.399 [0] |
1.599 [8] |∎
1.799 [0] |
1.999 [1] |
Latency distribution:
0 % in 0 ns
0 % in 0 ns
0 % in 0 ns
75 % in 0.50 ms
90 % in 0.52 ms
95 % in 0.58 ms
99 % in 1.17 ms
Status code distribution:
[OK] 1000 responses
|
大部分请求都能在1ms左右响应。
2. 负载参数
接着增加负载参数
1
2
3
4
5
6
7
8
| ghz -c 10 -n 1000 \
--insecure \
--proto ./hello_world.proto \
--call helloworld.Greeter.SayHello \
-d '{"name":"Joe"}' \
--load-schedule=step --load-start=50 --load-step=10 --load-step-duration=5s \
-o report.html -O html \
0.0.0.0:50051
|
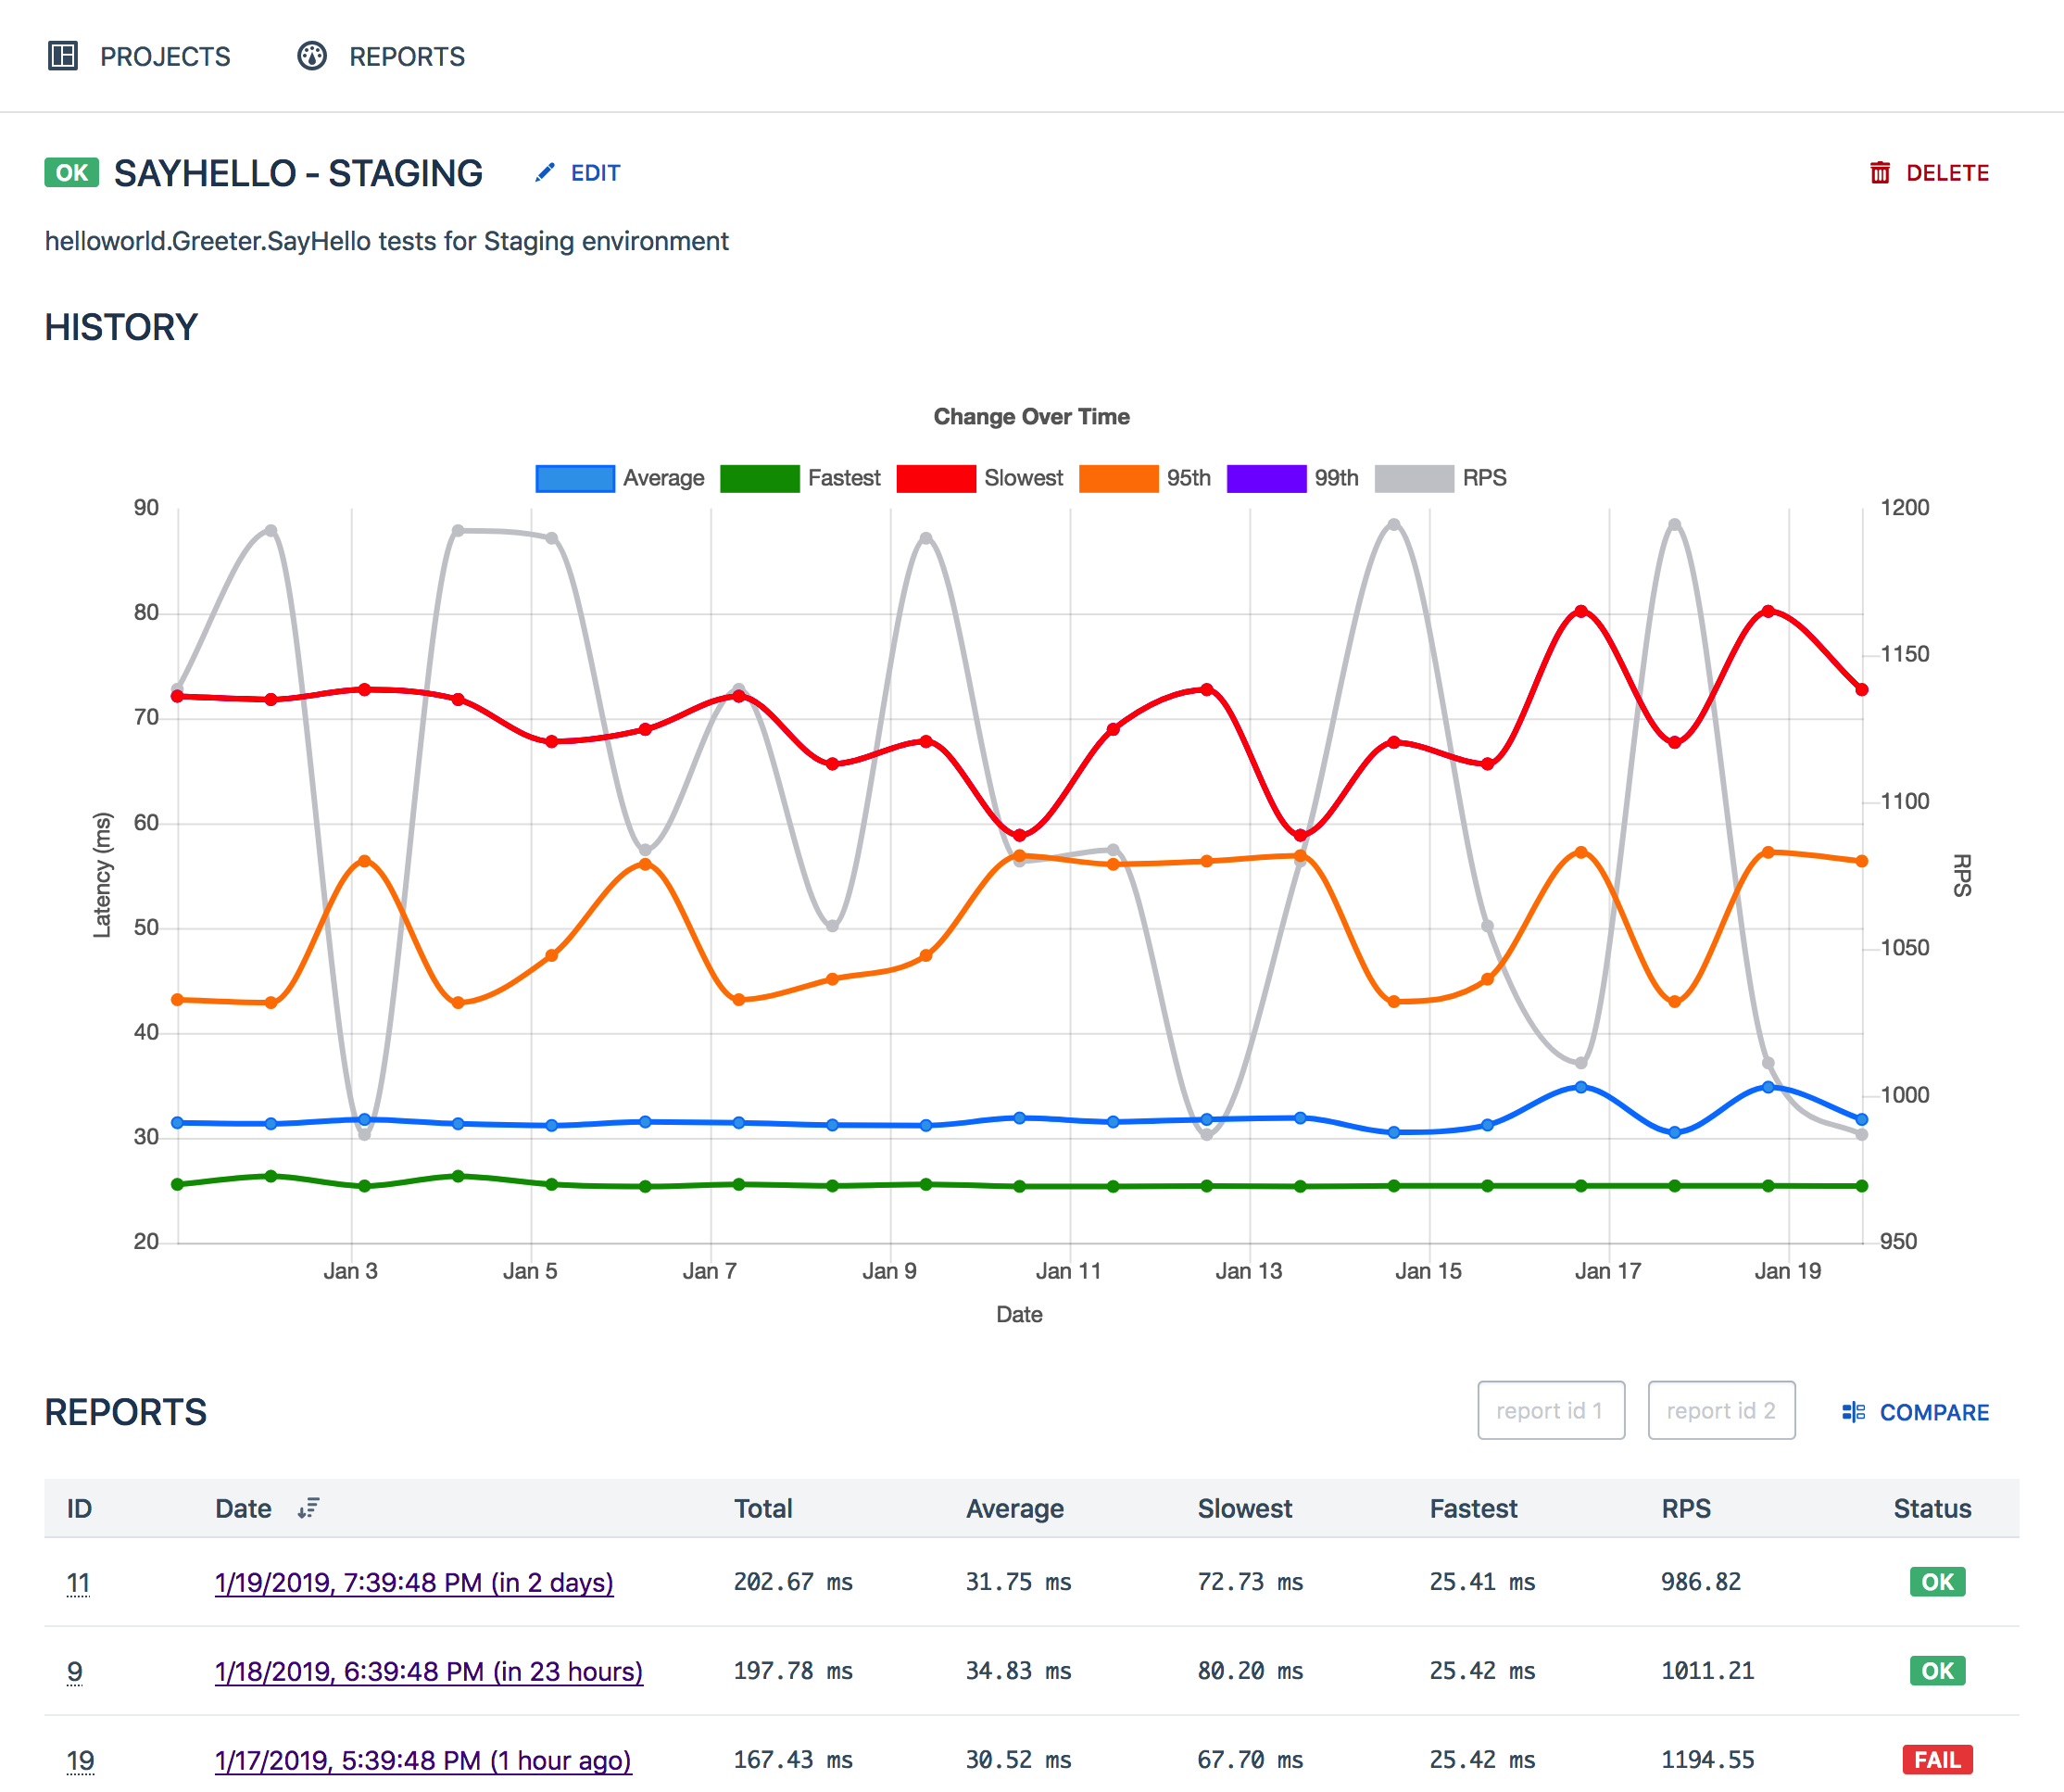
这次指定使用HTML方式输出结果,执行完成后可以在当前目录看到输出的HTML文件
具体内容如下:
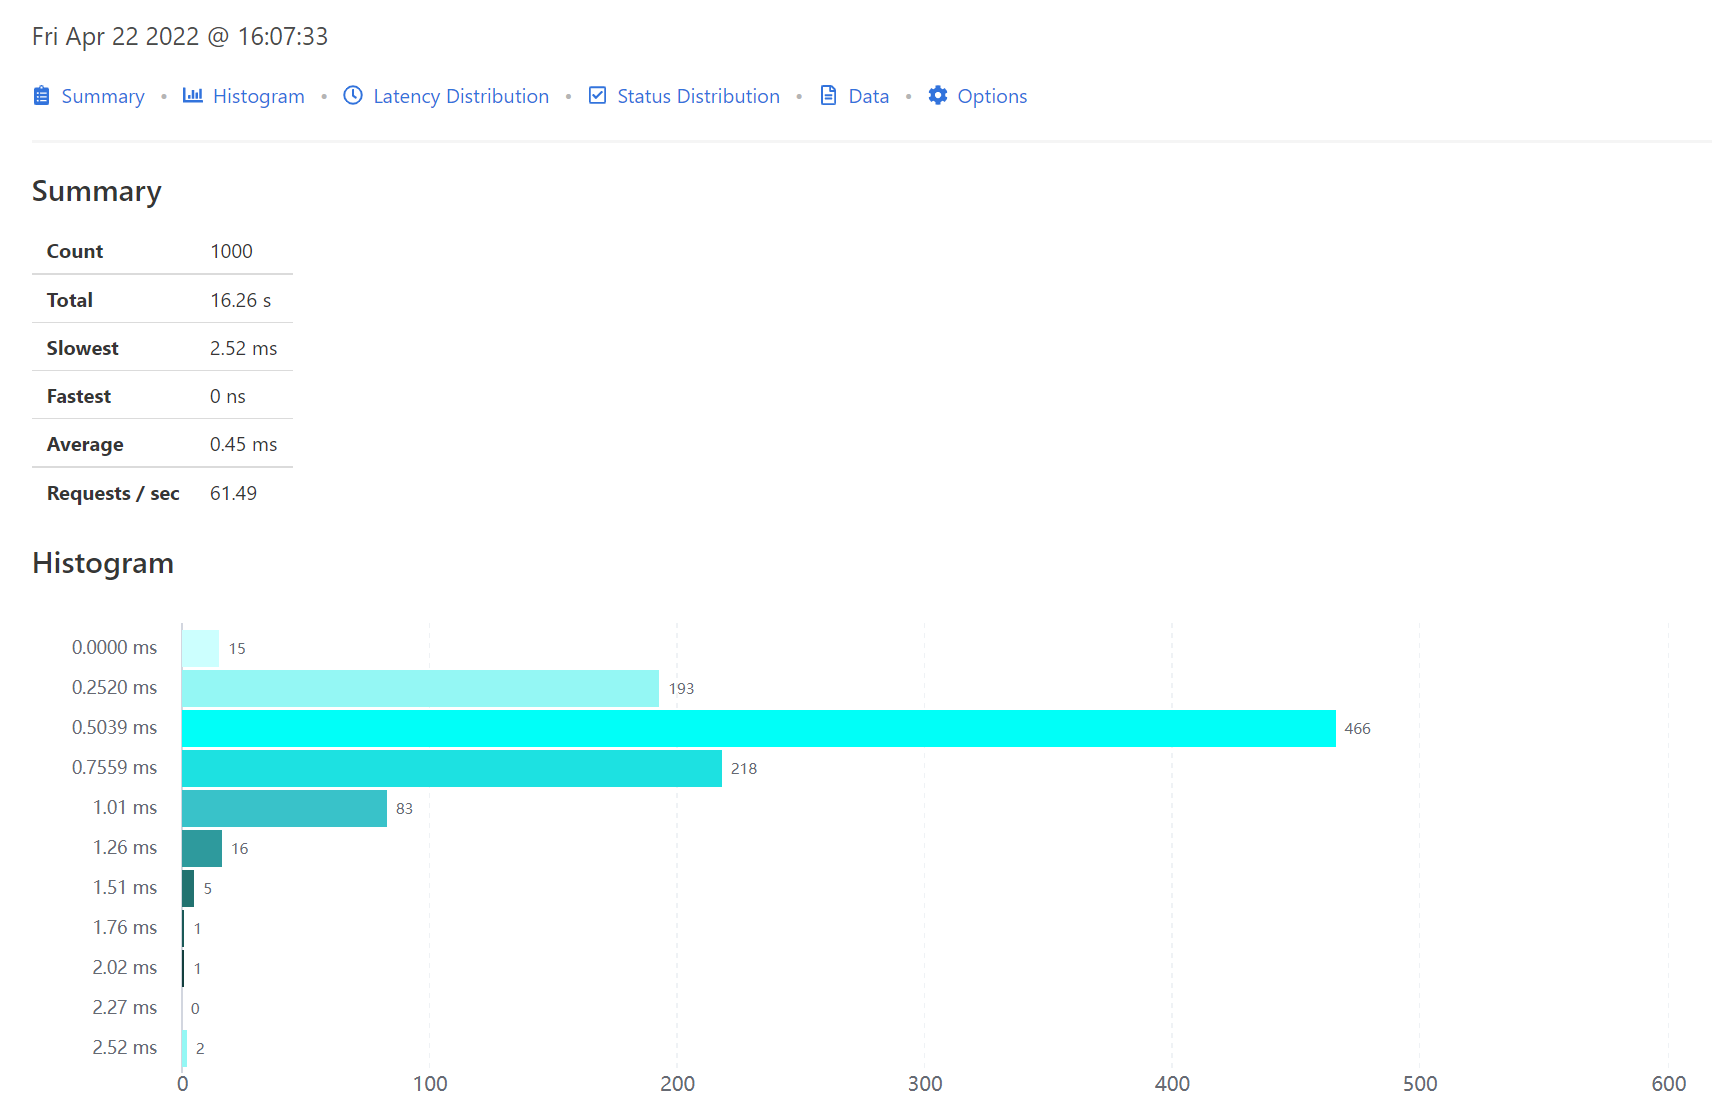
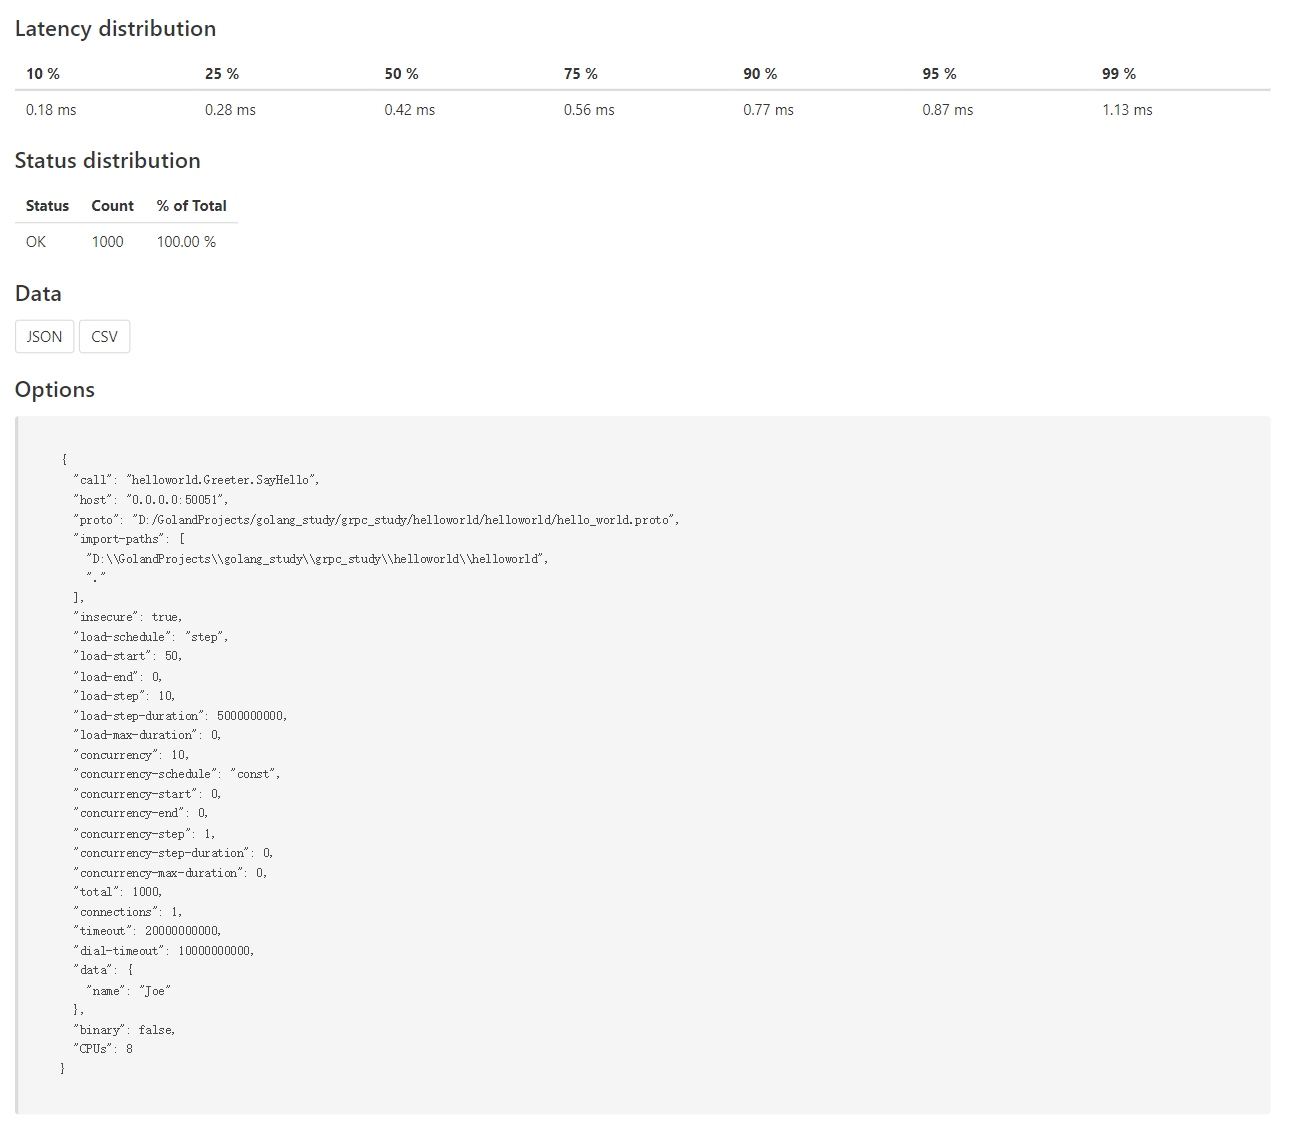
相比之下HTML方式更加直观。
3. 并发参数
最后使用并发参数
1
2
3
4
5
6
7
8
| ghz -n 10000 \
--insecure \
--proto ./hello_world.proto \
--call helloworld.Greeter.SayHello \
-d '{"name":"Joe"}' \
--rps 200 --concurrency-schedule=step --concurrency-start=5 --concurrency-step=5 --concurrency-end=50 --concurrency-step-duration=5s \
-o report.json -O pretty \
0.0.0.0:50051
|
-c参数 是const concurrency schedule模式下所使用的,所以在这里没有使用
执行了这个命令出现了以下问题:
1
2
3
4
5
6
7
| panic: send on closed channel
goroutine 37 [running]:
github.com/bojand/ghz/load.(*StepWorkerTicker).Run.func1()
D:/a/ghz/ghz/load/worker_ticker.go:109 +0xa7
created by github.com/bojand/ghz/load.(*StepWorkerTicker).Run
D:/a/ghz/ghz/load/worker_ticker.go:79 +0x1d4
|
原作者使用版本0.90.0也出现了此问题,于是发出了issues268,但是库作者声称0.96.0版本修复此问题。本文使用的是0.108.0版本,重新出现了此问题。
3.2 ghz/runner编程方式
编程方式更加灵活,同时可以直接使用二进制请求数据也比较方便。
相关代码如下:
1
2
3
4
5
6
7
8
9
10
11
12
13
14
15
16
17
18
19
20
21
22
23
24
25
26
27
28
29
30
31
32
33
34
35
36
37
38
39
40
41
42
43
44
45
46
47
48
49
50
51
52
53
| package main
import (
"log"
"os"
"github.com/bojand/ghz/printer"
"github.com/bojand/ghz/runner"
"github.com/golang/protobuf/proto"
pb "github.com/lixd/grpc-go-example/helloworld/helloworld"
)
// 官方文档 https://ghz.sh/docs/intro.html
func main() {
// 组装BinaryData
item := pb.HelloRequest{Name: "lixd"}
buf := proto.Buffer{}
err := buf.EncodeMessage(&item)
if err != nil {
log.Fatal(err)
return
}
report, err := runner.Run(
// 基本配置 call host proto文件 data
"helloworld.Greeter.SayHello", // 'package.Service/method' or 'package.Service.Method'
"localhost:50051",
runner.WithProtoFile("../helloworld/helloworld/hello_world.proto", []string{}),
runner.WithBinaryData(buf.Bytes()),
runner.WithInsecure(true),
runner.WithTotalRequests(10000),
// 并发参数
runner.WithConcurrencySchedule(runner.ScheduleLine),
runner.WithConcurrencyStep(10), // line schedule 斜率
runner.WithConcurrencyStart(5),
runner.WithConcurrencyEnd(100),
)
if err != nil {
log.Fatal(err)
return
}
// 指定输出路径
file, err := os.Create("report.html")
if err != nil {
log.Fatal(err)
return
}
rp := printer.ReportPrinter{
Out: file,
Report: report,
}
// 指定输出格式
_ = rp.Print("html")
}
|
需要根据库文档进行构建使用,直接go get的无法使用,因为很多依赖没有下载。
运行测试会在当前目录输出report.html文件
1
2
3
| $ go run ghz.go
$ ls
ghz.go report.html
|
4. 小结
推荐使用ghz/runner编程方式+HTML格式输出结果。
- ghz/runner编程方式相比二进制方式更加灵活
- HTML格式输出结果更加直观