本文主要对 gRPC 框架做了简单的介绍,同时记录了一个简单的 hello wolrd 教程。
原文作者: 意琦行
原文链接: gRPC(Go)教程(二)—Hello gRPC | 指月小筑|意琦行的个人博客
1. 概述
gRPC 系列相关代码见 https://github.com/lixd/grpc-go-example
gRPC 是一个高性能、通用的开源 RPC 框架,其由 Google 主要面向移动应用开发并基于 HTTP/2 协议标准而设计,基于 ProtoBuf(Protocol Buffers) 序列化协议开发,且支持众多开发语言。
与许多 RPC 系统类似,gRPC 也是基于以下理念:定义一个服务,指定其能够被远程调用的方法(包含参数和返回类型)。在服务端实现这个接口,并运行一个 gRPC 服务器来处理客户端调用。在客户端拥有一个存根能够像服务端一样的方法。
gRPC 默认使用 protocol buffers,这是 Google 开源的一套成熟的结构数据序列化机制(当然也可以使用其他数据格式如 JSON)。

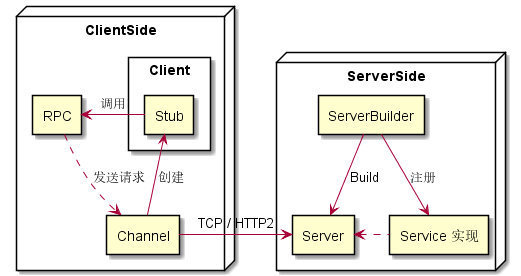
上图中列出了 gRPC 基础概念及其关系图。其中包括:Service(定义)、RPC、API、Client、Stub、Channel、Server、Service(实现)、ServiceBuilder 等。
2. 环境准备
1. protoc
首先需要安装 protocol buffers compile 即 protoc 和 Go Plugins。
具体见 Protobuf 章节
2. gRPC
然后是安装 gRPC 。
1
| $ go get -u google.golang.org/grpc
|
国内由于某些原因,安装超时的话可以在这里查看解决办法:https://github.com/grpc/grpc-go#FAQ
或者设置 GOPROXY ,具体看这里 https://goproxy.cn
3. gRPC plugins
接着是下载 gRPC Plugins,用于生成 gRPC 相关源代码。
1
| $ go install google.golang.org/grpc/cmd/protoc-gen-go-grpc
|
3. Helloworld
环境
首先确保自己的环境是 OK 的:
- 终端输入 protoc –version 能打印出版本信息;
- $GOPATH/bin 目录下有
protoc-gen-go、protoc-gen-go-grpc 这两个可执行文件。
本教程版本信息如下:
- protoc 3.20.0
- protoc-gen-go v1.28.0
- gPRC v1.45.0
- protoc-gen-go-grpc 1.2.0
项目结构如下:
1
2
3
4
5
6
7
8
9
| helloworld/
├── client
│ └── main.go
├── helloworld
│ ├── hello_world_grpc.pb.go
│ ├── hello_world.proto
│ └── hello_world.pb.go
└── server
└── main.go
|
1. 编写.proto文件
hello_world.proto文件内容如下:
 1
 2
 3
 4
 5
 6
 7
 8
 9
10
11
12
13
14
15
16
17
18
19
20
| //声明proto的版本 只有 proto3 才支持 gRPC
syntax = "proto3";
// 将编译后文件输出在 ./helloworld 目录
option go_package = "./helloworld";
// 指定当前proto文件属于helloworld包
package helloworld;
// 定义一个名叫 greeting 的服务
service Greeter {
// 该服务包含一个 SayHello 方法 HelloRequest、HelloReply分别为该方法的输入与输出
rpc SayHello (HelloRequest) returns (HelloReply) {}
}
// 具体的参数定义
message HelloRequest {
string name = 1;
}
message HelloReply {
string message = 1;
}
|
这里定义了一个服务 Greeter,其中有一个方法名为 SayHello。其接收参数为HelloRequest类型,返回HelloReply类型。
服务定义为:
1
2
3
4
5
| // 定义一个名叫 greeting 的服务
service Greeter {
// 该服务包含一个 SayHello 方法 HelloRequest、HelloReply分别为该方法的输入与输出
rpc SayHello (HelloRequest) returns (HelloReply) {}
}
|
2. 编译生成源代码
使用 protoc 编译生成对应源文件,具体命令如下:
1
| protoc --go_out=. --go-grpc_out=. ./hello_world.proto
|
会在helloworld目录生成hello_world.pb.go和hello_world_grpc.pb.go两个文件。
3. Server
 1
 2
 3
 4
 5
 6
 7
 8
 9
10
11
12
13
14
15
16
17
18
19
20
21
22
23
24
25
26
27
28
29
30
31
32
33
34
35
36
37
38
39
40
41
| package main
import (
"context"
"log"
"net"
pb "golang_study/grpc_study/helloworld/helloworld"
"google.golang.org/grpc"
)
const (
port = ":50051"
)
// greeterServer 定义一个结构体用于实现 .proto文件中定义的方法
// 新版本 gRPC 要求必须嵌入 pb.UnimplementedGreeterServer 结构体
type greeterServer struct {
pb.UnimplementedGreeterServer
}
// SayHello 简单实现一下.proto文件中定义的 SayHello 方法
func (g *greeterServer) SayHello(ctx context.Context, in *pb.HelloRequest) (*pb.HelloReply, error) {
log.Printf("Received: %v", in.GetName())
return &pb.HelloReply{Message: "Hello " + in.GetName()}, nil
}
func main() {
listen, err := net.Listen("tcp", port)
if err != nil {
log.Fatalf("failed to listen: %v", err)
}
s := grpc.NewServer()
// 将服务描述(server)及其具体实现(greeterServer)注册到 gRPC 中去.
// 内部使用的是一个 map 结构存储,类似 HTTP server。
pb.RegisterGreeterServer(s, &greeterServer{})
log.Println("Serving gRPC on 0.0.0.0" + port)
if err := s.Serve(listen); err != nil {
log.Fatalf("failed to serve: %v", err)
}
}
|
具体步骤如下:
- 定义一个结构体,必须包含
pb.UnimplementedGreeterServer 对象; - 实现 .proto文件中定义的API;
- 将服务描述及其具体实现注册到 gRPC 中;
- 启动服务。
4. Client
 1
 2
 3
 4
 5
 6
 7
 8
 9
10
11
12
13
14
15
16
17
18
19
20
21
22
23
24
25
26
27
28
29
30
31
32
33
34
35
36
37
38
39
40
| package main
import (
"context"
"log"
"os"
"time"
pb "github.com/lixd/grpc-go-example/helloworld/helloworld"
"google.golang.org/grpc"
)
const (
address = "localhost:50051"
defaultName = "world"
)
func main() {
// 跳过对服务器证书的验证,这样服务端和客户端就成立明文通信。
// grpc.Dial默认建立连接是异步的,加了这个参数后会等待所有连接建立成功后再返回
conn, err := grpc.Dial(address, grpc.WithInsecure(), grpc.WithBlock())
if err != nil {
log.Fatalf("did not connect: %v", err)
}
defer conn.Close()
c := pb.NewGreeterClient(conn)
// 通过命令行参数指定 name
name := defaultName
if len(os.Args) > 1 {
name = os.Args[1]
}
ctx, cancel := context.WithTimeout(context.Background(), time.Second)
defer cancel()
r, err := c.SayHello(ctx, &pb.HelloRequest{Name: name})
if err != nil {
log.Fatalf("could not greet: %v", err)
}
log.Printf("Greeting: %s", r.GetMessage())
}
|
具体步骤如下:
- 首先使用
grpc.Dial() 与 gRPC 服务器建立连接; - 使用
pb.NewGreeterClient(conn)获取客户端; - 通过客户端调用ServiceAPI方法
client.SayHello。
5. Test
先运行服务端
1
2
3
| helloworld/server$ go run main.go
2022/04/20 13:43:00 Serving gRPC on 0.0.0.0:50051
2021/01/23 14:47:32 Received: world
|
然后运行客户端
1
2
| helloworld/client$ go run main.go
2022/04/20 13:43:41 Greeting: Hello world
|
到此为止 gRPC 版的 hello world 已经完成了。
4. 小结
使用 gRPC 的 3个 步骤:
- 需要使用 protobuf 定义接口,即编写 .proto 文件;
- 然后使用 protoc 工具配合编译插件编译生成特定语言或模块的执行代码,比如 Go、Java、C/C++、Python 等。
- 分别编写 server 端和 client 端代码,写入自己的业务逻辑。
gRPC 系列相关代码见 Github
5. 参考
https://grpc.io/docs/languages/go/quickstart/
https://github.com/grpc/grpc-go
